
Push++ Installations Anleitung
- Installation des Plugins
wbb-elite.de/shop/product/59/ - Per SSH auf den Server anmelden und folgende Commands ausführen
- cd /pfad/zum/wcf/acp/pushXX/
- chmod +x install.sh
- chmod +x uninstall.sh
- ./install.sh
- Secret Key kopieren und in die Konfiguration einfügen
- Ins ACP gehen und in den Optionen/Konfiguration die Kategorie Push++ auswählen und dort den Secret Key suchen und in die zwischen Ablage kopieren
- Die Datei /etc/pushxx.conf bearbeiten und den Secret Key einfügen
- Anpassung der Pushxx Konfiguration
Hier euere IP Eintragen auf welche IP der Socket Server hören soll, bitte nur verändern wenn Ihr wisst was Ihr macht.Code
#
# The IPv4 address the server should listen on.
# This affects the web socket and the HTTP server.
# Only listen on your public address if you know what you do. You have been warned!
#
bind_address = 127.0.0.1
Am besten immer auf 127.0.0.1 hören lassen, dann ist der Server nicht von aussen erreichbar sondern nur im Lokalen Netzerwerk.Ausgabe des Push-Servers in eine Log Datei. Bitte immer einen Absoluten Pfad angeben.Code# # Log file. Will be created if not existing. # Make sure the push user has write permission to this location # or you have to pre-create the log file and set permissions accordingly. # log_path = /var/log/push.logDies ist der Port mit dem sich das WSC/WCF, um Nachrichten die an die Benutzer verteilt werden sollen, verbindent.Code# # The port to listen on for web requests from the WSC/WCF plugin. # Default: 8082 # server_port = 8082
Dieser Port sollte nur im Lokalen Netzwerk erreichbar sein.Dies ist der Websocket Port, dieser wird für den Revers Proxy benötigt. Und kann hier auf einen freien Port geändert werden.Code# # The port to listen on for web socket connections. # Configure your proxy (Nginx/Apache with mod_wstunnel) to forward connections to this port. # Default: 8081 # socket_port = 8081Hier kann angegeben werden ob ein ausführlicher Log ausgegeben wird, nur für Debugging gedacht.Code# # Enable Verbose logging # # Set this to true if you want to enable debug logging. # This is useful if you are are a plugin developer and want to test your plugin with Push++ # verbose = false
Bitte nur folgende Werte Eintragen. true oder falseHier muss euer Secret Key aus dem ACP eingetragen werden. Sollte keiner hinterlegt wurden sein, startet der Push Server nicht.Code# # The secret key to authenticate requests from the WSC/WCF plugin. # Open the configuration page of the plugin to get your secret key. # The sever process may not start if this value is not set correctly. # secret_key = - Den Reverse Proxy konfigurierenA
- Apache
- In dem Ordner gibt es eine apache.example.conf Datei, in dieser steht die Standard Konfiguration für den Apache die in die passenden VirtualHost eingetragen werden muss.
- Hier eine Beispiel Konfiugration für euren vHost.
Code
Alles anzeigen<virtualhost *:80> ServerName www.eure-domain.de DocumentRoot /var/www/html . . . ProxyPreserveHost on ProxyPass "/socket" "ws://127.0.0.1:8081" ProxyPassReverse "/socket" "ws://127.0.0.1:8081" </virtualhost> #For SSL <virtualhost *:443> ServerName www.eure-domain.de DocumentRoot /var/www/html SSLEngine on SSLCertificateFile /path/to/www_yoursite_com.crt SSLCertificateKeyFile /path/to/www_yoursite_com.key SSLCertificateChainFile /path/to/DigiCertCA.crt . . . ProxyPreserveHost on ProxyPass "/socket" "ws://127.0.0.1:8081" ProxyPassReverse "/socket" "ws://127.0.0.1:8081" </virtualhost>
- Nginx
- In dem Ordner gibt es eine nginx.example.conf Datei, diese muss in dem Server block
eingetragen werden für die passende Domain.
Hier ein Beispiel wie diese Eingetragen werden sollCode
Alles anzeigenserver { listen 443 ssl http2; listen [::]:443 http2 ssl; server_name www.eure-domain.de eure-domain.de; index index.html index.htm index.php; root /var/www/html/; . . . location /socket { proxy_set_header Upgrade $http_upgrade; proxy_set_header Connection "upgrade"; proxy_http_version 1.1; proxy_set_header X-Forwarded-For $proxy_add_x_forwarded_for; proxy_set_header Host $host; proxy_pass http://127.0.0.1:8081/$is_args$args; proxy_read_timeout 86400s; proxy_send_timeout 86400s; proxy_redirect off; } } - Bitte beachten, sollten Änderungen an der Port Konfiguration vorgenommen wurden bitte ebenfalls dort ändern.
- In dem Ordner gibt es eine nginx.example.conf Datei, diese muss in dem Server block
eingetragen werden für die passende Domain.
- Apache
- Der Pfad /socket kann Individuell angepasst werden, muss jedoch dann in den Optionen auch so eingetragen werden.
- Sobald der Pfad im Webeserver hinterlegt wurde, muss dieser auch in den Optionen im ACP hinterlegt werden. Dafür
eurer Domain und dann den gewählten Pfad für die Server Konfiguration eintragen.
wss://www.eure-domain.de/socket, bittet beachtet das eure Protokoll immer mit wss:// oder ws:// anfängt.
Und solltet Ihr euren Pfad zum Socket geändert haben, muss hier auch ein andere Eingetragen wurden sein. - Dann noch zum Schluss euren Backend Push Server URL hinterlegen, sollte der Server Lokal sein einfach http://127.0.0.1:8082 oder aber auch http://localhost:8082 davor schreiben, solltet Ihr den Port geändert haben natürlich auch hier den richtigen Port eintragen
- Am ende sollte diese Konfiguration im ACP etwa so aussehen
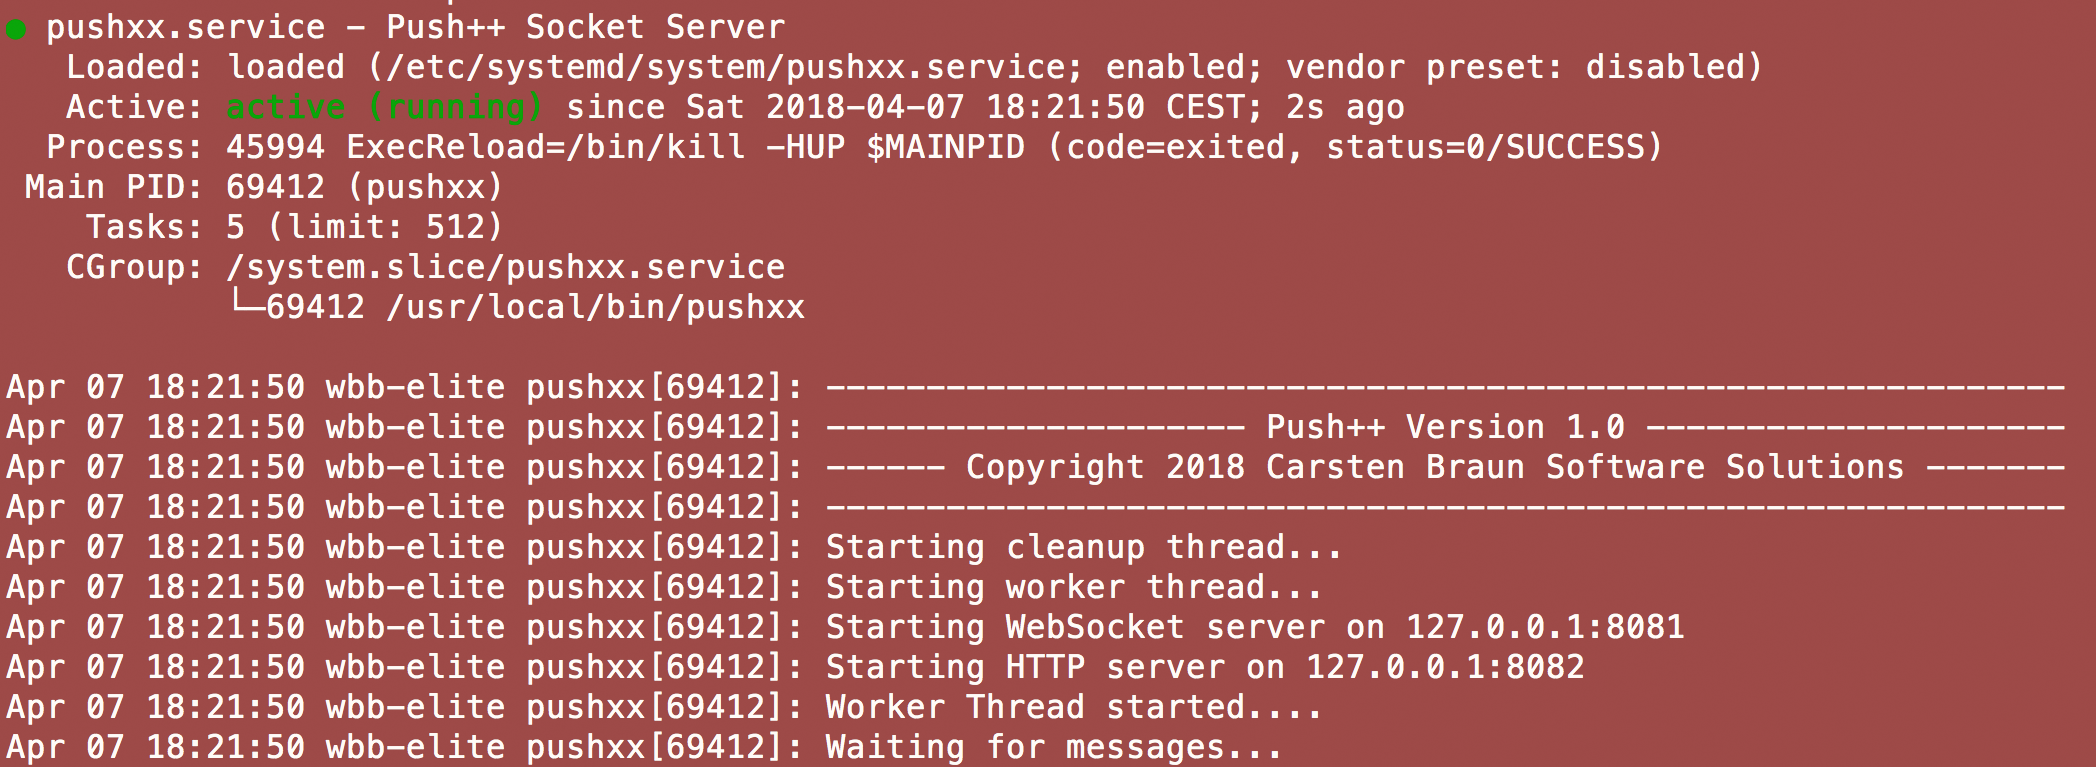
- Den Push++ Service starten mit systemctl start pushxx oderservice pushxx start
- Anschließend mit dem Command systemctl status pushxx oderservice pushxx status prüfen ob der Service läuft.
Dies sollte in etwa so aussehen: